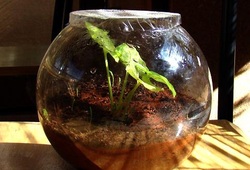
A. Message in a bottle
Algorithm: (Adapted from: Gunckel, Kristen (1999), “Connecting an ecology field experience to the classroom,” Science and Children. )
Goal: Students integrate ecosystem concepts and foster questioning, observing, and hypothesizing skills.
Objective: Make a model of an ecosystem in a 2-L bottle using plants, soil, gravel, and water
Directions: In partners assembly an ecosystem using the above materials and a plant found from outside. Draw a detailed picture of your ecosystem once it is closed. Observe for four weeks. Create a question, and a hypothesis to answer it. Evaluate this through your observations. Add a consumer (i.e. small insect) fourth week. Evaluate if it has enough food. End of four weeks disassemble & return outside.
My Transformation: Can an ecosystem remain healthy when taken from its native habitat?
Gather the minimum components to create (a working model of) a healthy ecosystem in a somewhat closed vessel who when returned to the earth in four weeks are able to reintegrate successfully with their native community. The vessel needs to be appropriate size so all projects fit in classroom.
Definitions:
Somewhat closed vessel:closed enough no mobile creatures will enter or leave but open enough for moisture, gas, air & light to enter and exit
Healthy: as closely as possible mimicking a chosen biological community of organisms; including abiotic components such as soil, air, water, sunlight interacting in a balanced way where life and death cycles mirror as close as possible those in the native community upon which this model is based.
Reintegrate successfully: upon reintroduction to their native habitat, these organisms & nonliving components take up their previous roles in feeding and drawing from the web of life in that community.
Assessment: Class brainstorms criteria. Non-negotiable is all field journal entries are dated, legible, and organized. Each student observes and records chosen ecosystem in natural state for two weeks, writes up details of vessel components including how it will work and be monitored, continues observing and recording on routine basis determined by each student. Upon disassembly each student observes the native ecosystem with its removed parts reintroduced and records reintegration process for an additional two weeks.
B. Insect Multiplication Generations
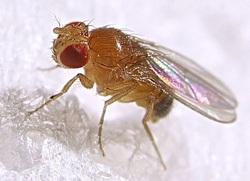
Algorithm:The life cycle of a fruit fly is so short that a few weeks can produce many generations. Larvae emerge from eggs in one or two days, pupate for five days, and then change into adults and mate. Female fruit flies are larger than males and have a bigger abdomen. Males have a black-tipped abdomen.
Materials: one- two glass jars, ripe banana or other fruit, crumpled paper, magnifying glass, test tubes, foil
Directions: Place ripe fruit in the jar and let it sit in the open until fruit flies appear; they may either enter the jar or hatch from eggs on the fruit. Place a piece of crumpled paper inside the jar, then cover with absorbent cotton. Observe larvae, pupae, and adult fruit flies that were caught and the new generation of flies. Continue preparing another habitat jar by raising grandchildren. To observe fruit flies closely, place them in foil wrapped test tubes which have small openings for observation. The fruit flies, attracted by light, come to the opening. Use the magnifying glass to observe detail.
My Transformation: How many generations of fruit flies can be created in three weeks?
Design an experiment in which you and a partner determine how many generations of fruit flies can be created in three weeks.
Each partner is given three male and three female fruitflies to begin. Materials to choose from include: quart mason jars, test tubes, compost scraps, lids, foil, saran wrap, tape, markers, magnifying lenses.
All partner sets record process of designing an experiment in field journal: pertinent background knowledge, observations, hypothesis, planned procedure, methods, data, discussion, and conclusion.
Each group presents their findings and process to the class for ten minutes week four of the unit. From these presentations we will come up with potential answers to the above question as a class.
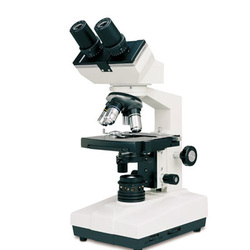
C. Microscope Challenge
Algorithm: (T. Trimpe 2005 http://sciencespot.net/)
Directions: Label the parts of the microscope. Figure out how to calculate magnification power. Calculate magnification power for each objective lens. Record what happens when magnification power is increased. Explain largest objective lens' challenge for some slides. View prepared slides. Label and draw what you see at each magnification. Make a wet mount from provided pond water. Find an organism. Draw and label at three magnification powers.
My Transformation: How does a microscope work?
How many parts are there and what do they do? How many levels of magnification are there? When would you use this tool? What are two different types of slides you can make and how?
Figure out how this tool works
Each partner set is given a microscope and a prepared slide of plant cell walls. In field journals students record each part's function as they figure it out.
Materials provided: microscopes, prepared slides, blank slides, coverslips, cloths for cleaning, water, specimens, and hint cards which include basics of how to prepare slides properly
Once students grasp the main concepts of microscope use and function, they brainstorm what to not do with a microscope, and what to be careful about regarding its use, as well as any lingering questions. The teacher reviews this with the students and point out any missing information critical for safe and proper use of this tool. Also the distinction between field, compound, and dissecting microscopes is mentioned.
The next class, students compare plant and animal cells: using available specimens to create slides as well as toothpicks and q-tips for cheek swaps.
Drawings and notes are recorded in field journal.
Lastly students can choose something they are curious about to look at under the microscope, do so, record, and draw in journal, share with the class.
